代码先锋网 代码片段及技术文章聚合
Windows下编译使用NDK编译Boost库
背景
安卓开发中需要使用线程库
准备工作
- 下载ndk10e:地址
- 下载boost库:boost_1_69_0.zip
- 将“android-ndk-r10e-windows-x86.zip”和“boost_1_69_0.zip”解压到G盘根目录,得:“G:\boost_1_69_0\”和"G:\android-ndk-r10e"
成功编译的步骤
- 运行"G:\boost_1_69_0\bootstrap.bat"
- 替换"G:\boost_1_69_0\project-config.jam"文件的内容,可复制下文:
# define platform name of ndk
import os ;
if [ os.name ] = CYGWIN || [ os.name ] = NT
{
    androidPlatform = windows ;
}
else if [ os.name ] = LINUX
{
    androidPlatform = linux-x86_64 ;
}
else if [ os.name ] = MACOSX
{
    androidPlatform = darwin-x86 ;
}

# replace with your own path
ANDROID_NDK = "G:/android-ndk-r10e" ;

# compile with gcc, you can change compiler to clang or others
using gcc : 4.9 : $(ANDROID_NDK)/toolchains/arm-linux-androideabi-4.9/prebuilt/$(androidPlatform)/bin/arm-linux-androideabi-g++ :
<archiver>$(ANDROID_NDK)/toolchains/arm-linux-androideabi-4.9/prebuilt/$(androidPlatform)/bin/arm-linux-androideabi-ar
<ranlib>$(ANDROID_NDK)/toolchains/arm-linux-androideabi-4.9/prebuilt/$(androidPlatform)/bin/arm-linux-androideabi-ranlib
<compileflags>-I$(ANDROID_NDK)/platforms/android-19/arch-arm/usr/include
<compileflags>-I$(ANDROID_NDK)/sources/cxx-stl/gnu-libstdc++/4.9/include
<compileflags>-I$(ANDROID_NDK)/sources/cxx-stl/gnu-libstdc++/4.9/include/backward
<compileflags>-I$(ANDROID_NDK)/sources/cxx-stl/gnu-libstdc++/4.9/libs/armeabi-v7a/include
<compileflags>-fexceptions
<compileflags>-frtti
<compileflags>-fpic
<compileflags>-ffunction-sections
<compileflags>-funwind-tables
<compileflags>-D__ARM_ARCH_5__
<compileflags>-D__ARM_ARCH_5T__
<compileflags>-D__ARM_ARCH_5E__
<compileflags>-D__ARM_ARCH_5TE__
<compileflags>-D__ARM_ARCH_7__
<compileflags>-D__ARM_ARCH_7A__
<compileflags>-Wno-psabi
<compileflags>-march=armv7-a
<compileflags>-mtune=xscale
<compileflags>-mfloat-abi=softfp
<compileflags>-marm
<compileflags>-mthumb
<compileflags>-Os
<compileflags>-std=gnu++11
<compileflags>-fomit-frame-pointer
<compileflags>-fno-strict-aliasing
<compileflags>-finline-limit=64
<compileflags>-Wa,--noexecstack
<compileflags>-DANDROID
<compileflags>-D__ANDROID__
<compileflags>-D__ARM_EABI__
<compileflags>-DNDEBUG
<compileflags>-O2
<compileflags>-g
;

# project default compiler
project : default-build <toolset>gcc-4.9 ;

# replace with libraries you wanna to build
#libraries = --with-container --with-coroutine --with-fiber --with-graph --with-graph_parallel --with-log --with-python --with-test --with-type_erasure --with-atomic --with-date_time --with-program_options --with-chrono --with-context --with-iostreams --with-locale --with-mpi --with-serialization  --with-timer --with-wave --with-math --with-random --with-exception --with-filesystem --with-thread --with-system --with-regex --with-program_options ;

libraries = --with-thread ;
- 打开cmd窗口,切换当前目录到"G:\boost_1_69_0",执行命令
.\b2.exe link=static runtime-link=static target-os=linux --stagedir=android
遇到的问题
找不到g++
报错的部分内容如下:
G:/boost_1_69_0/tools/build/src/tools\gcc.jam:164: in gcc.init from module gcc
error: toolset gcc initialization:
error: provided command 'G:/android-ndk-r10e/toolchains/arm-linux-androideabi-4.
9/prebuilt/windows-x86_64/bin/arm-linux-androideabi-g++' not found
error: initialized from project-config.jam:56
核对文件的路径发现,其真实的路径应该为"G:/android-ndk-r10e/toolchains/arm-linux-androideabi-4.
9/prebuilt/windows/bin/arm-linux-androideabi-g++",观察“project-config.jam”发现,路径中的只有“windows”没有“-x86_64”,所以需要删除。如下图所示~~~~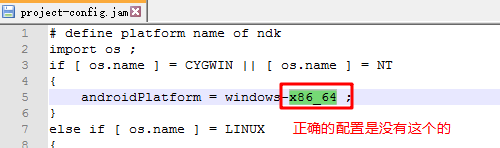
参数错误
报错的部分内容如下:
Performing configuration checks

    - default address-model    : 32-bit
    - default architecture     : arm

Building the Boost C++ Libraries.


    - lockfree boost::atomic_flag : no
G:/boost_1_69_0/tools/build/src/tools\common.jam:973: in toolset-tag
*** argument error
* rule numbers.less ( n1 n2 )
* called with: ( 4 )
* missing argument n2
G:/boost_1_69_0/tools/build/src/util\numbers.jam:66:see definition of rule 'numb
ers.less' being called~~~~
根据提示,查看文件“G:/boost_1_69_0/tools/build/src/tools\common.jam”的第973行,如下图所示: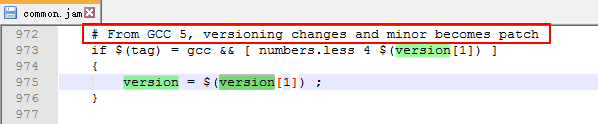 猜测与gcc的版本有关系,而从参考文档1中复制的配置文件中有关于gcc的内容只有如图所示的部分:
 ,统合错误提示,猜测与前面的android有关,删除后再次尝试,编译成功
延伸思考
- 配置文件中已经指定了默认的toolset,所以不用在命令行中再次指定了,同理,需要编译的library也在配置文件中指定了,也不需要在命令行中再次指定,故,相比与参考文档,第3步的命令更短、更方便。猜测可以全部放到配置文件中,命令仅
.\b2.exe,应该也行~~~~
参考文档
智能推荐
boost库编译选项(windows)
boost库编译过程如下: 1、下载boost库(本实例用的boost1.63)并解压 2、进入boost库解码目录,执行bootstrap.bat,生成b2或bjam可执行编译工具; 3、利用b2或bjam编译boost库(进入cmd命令行,然后进入boost解码目录--b2工具所在目录) 在不特定指定编译选项情况下,boost是编译成动态...
windows gcc 编译 boost 库
bootstrap.bat 文件修改 call .\build.bat 改成 call .\build.bat gcc SET TOOLSET=msvc 改成 SET TOOLSET=gcc 执行 ./bootstrap.bat 执行...
windows下使用android-ndk编译c++动态库
一.下载安装android-ndk 下载android-ndk-r10d windows 版 解压后放到某目录下 如:D:\sdk\android-ndk-r10d 高级系统设置中 添加环境变量: ANDROID_NDK : D:\sdk\android-ndk-r10d PATH: %ANDROID_NDK% 二.写.mk 文件 编译动态库 项目目录格式:...
windows下编译Android版本的boost库文件
1.起因: 手上有一个用到了boost的asio库和thread库的工程要编译到手机上(Android版本和ios版本),本文只介绍如何编译到Android版本,ios版本之后再介绍,也许就不介绍了(注:因为mac下官方有教程如何编译) 2.准备工作 2.1 下载boost库,我这里用到的是1.58.0 2.2 下载NDK(注:Google官方地址,需要FQ),根据情况自己选择下载版本,我这里用的...
linux下boost库编译
编译指定库:例(libboost_thread.so) 编译全部库 默认生成再stage/lib/目录下,若要制定生成路径,脚本参数加上'--prefix=/***/***'。 注:编译可能碰上各种报错,缺少各类库的支持,zlib、bz2等,视情况安装。终端看到‘The Boost C++ Libraries were successfully built!’这句话时才表示...
猜你喜欢
windows 系统 cmake 编译 python 使用 boost 库的问题
使用 cmake 编译跨平台的开源框架,遇到 cmake 编译出错,主要报错是 FindBoost.cmake 通过各种输入日志(message),发现有几个地方需要注意,现记录下来 搞了一上午,一直报错,最后发现是没有设置Boost_USE_STATIC_LIBS,或者Boost_LIB_PREFIX导致的。...
Windows下 ndk 编译程序
环境变量添加 Android 相关设置: ANDROID_HOME C:\Users\zhanghb\AppData\Local\Android\Sdk ANDROID_NDK C:\Users\zhanghb\AppData\Local\Android\Sdk\ndk\21.1.6352462 创建一...
windows下编写和编译ndk文件
配置windows环境 windows路径配置 编译: 到 getcpuTest 目录下,直接执行: 推送到Android系统 2.1 push进入 adb root adb remount adb push xxx /data...
ubuntu 14.04下使用ndk库编译hello步骤
菜鸟慢慢踩雷。最近需要编译安卓,需要学习关于编译linux上面跑的程序。 NDK提供一些标准库文件以及工具链。 首先找到关于ndk的文件路径。 没有的话去这里下载。 解压得到的压缩包 编译安装目录 由于--install-dir之前安装失败了。因此我需要使用强制--force安装命令。 将信息保存在ndk-build.log。以便以后查看。 声明编译工具链的路径 能看安装目录表示已经成功了。 找到...
使用vs编译boost库
1.下载,解压,使用命令行工具进入解压目录 2.执行boostrap.bat生成b2.exe和bjam.exe 3.使用“vs2015 x86 x64兼容工具命令提示符”进行编译...